January 31, 2022

Keycloak Custom User Storage SPI with SQL Server Database

If you have an application with its own database containing users, and you want to integrate with Keycloak, then one approach you can take is creating a custom User Storage SPI (Service Provider Interface) to expose those users to Keycloak.

A Proof-of-Concept demo can be found in my Github repo, and you can try it out using docker-compose.

Here are some of the features it implements:

  • Allows Keycloak to access users stored in a custom MS SQL database.
  • Allows configuring MS SQL connection from Keycloak's admin user interface. (Note: see section below about password storage.)
  • Exposes custom data as attributes in Keycloak, which can then be mapped as claims in the tokens.
  • Validates user passwords within the Custom User SPI, using the pbkdf2 algorithm with the same hashing configuration as Keycloak's default values.

Some additional notes are discussed below.

Database Configuration Password Storage

Keycloak has a feature to allow custom user storage SPIs to provide configuration items that can be rendered and handled on Keycloak's admin screen. The configuration interface provided by Keycloak has ProviderConfigProperty.PASSWORD, which I'm using to store the database connection password. This field shows up as a masked textbox in the UI, but it is not stored securely. If you check the Keycloak's database, you can see how it's being stored:

So for production use, consider implementing a secure way of storing the password.

Keycloak's Official Quick-Start Repo

After going through the documentation and getting started on implementing the user storage SPI, searching on the web brought up several examples, and I was following one in particular since it used ear packaging (which I thought would be helpful since I'd probably need to reference SQL Server JDBC package in my project). It wasn't until later that I found Keycloak's official quick-start repo that had two complete examples of implementing a user storage SPI. Knowing this earlier would've saved me some time, especially when I was pulling my hair out trying to figure out why some things were not working (one instance of that ended when I came across this getUserAdapter method).

Since the official quick-start repo is not mentioned in the user storage SPI documentation, I created a pull-request to add it. Not sure if it will be merged as is, but hopefully some form of it will show up in the documentation so that it can help future readers.

November 8, 2021

PBKDF2 Tool in Blazor

I first heard about Blazor a couple of years ago, and it sounded very interesting, especially the part about running .NET via WebAssembly on the browser. Blazor seems to have matured enough now and it's officially part of ASP.NET. Recently, my team needed a tool for PBKDF2 as we integrate with Keycloak, so I tried writing it in Blazor. Here are some of my thoughts on it so far.

You can find the full source in my GitHub repo.

C#

It's actually very refreshing to use just one language – C# (probably my favorite language) – for both the frontend and the backend, in a modern SPA-like paradigm, not WebForms with full page PostBacks like the good old days...? Of course, you're still using HTML and CSS (with support for SCSS and scoped CSS) for the "view" template. You can also call JavaScript via interop, which will be inevitable if you want to use built-in browser functionality such as alert().

WebAssembly

Originally, I wanted to build it as a WebAssembly project so that I can host as a static site and all you'd need is the browser to run it, but sadly, the KeyDerivation library doesn't support WebAssembly platform, so I had to use the Blazor Server hosting model.

The server hosting model uses WebSockets, and the server-side runs the logic, so scalability would need to be considered if writing real business applications with it.

JSX..?

I suppose this is more of a Razor template feature than Blazor, but I like that it's similar to React's JSX. For example, being able to use code blocks within the template, such as using the if statement to wrap around a component. (Never liked how Angular templates handle logic, such as ngIf and ngFor directives, where they are added as element attributes.)

Unit Testing

There's no official Microsoft library for unit testing Blazor, but an open-source project called bUnit seems popular for writing unit tests for Blazor components.

Being able to test the difference between snapshots of a render seems useful, but might get too complicated if testing a large change. Component isolation and keeping them small would help.

You can write tests as a razor component, which means you can use razor syntax for the component-under-test. Visual Studio editor's auto-formatting support still needs some work though.

DisplayName Validation Message Bug?

Perhaps there's a bug when using the DisplayName attribute on the InputText component. For both ValidationSummary and ValidationMessage<T>, setting the DisplayName attribute seems to have no effect on InputText. It just displays the property name, not the DisplayName.

InputNumber works fine though, as can be seen here:

...
validationErrorMessage = string.Format(ParsingErrorMessage, DisplayName ?? FieldIdentifier.FieldName);
...

Maybe it's not supported yet?

It does work if I use the [Display] attribute on the model itself, but nowadays I feel that's not the right place, since it breaks the layer boundary. If the model is serving as a "View Model", then it'd be okay.

Finding out how the [Required] attribute's message validation works was taking longer than I'd like, so I stopped at ValidationAttributeAdapterOfTAttribute.cs. If I can get to spend more time on this and can confirm it, perhaps I'll file a bug report. By the way, did you know that the ASP.NET Core solution has 480 projects? Took a very long time to load it on VS2019...

Dotnet Watch Hot Reload

It sometimes forces a manual reload, but I like the experience. VS2022 will have this feature, and will remain in .NET 6 CLI..

Misc.

RNGCryptoServiceProvider

RNGCryptoServiceProvider is obsolete in .Net 6 Preview. Be aware that a lot of examples on the internet still use this class for generating the salt.

JavaScript PBKDF2

There's actually a JavaScript library for handling PBKDF2, so yes, I could've just done it all in CodeSandbox:

import "./styles.css";
import { pbkdf2Sync } from "pbkdf2";

export default function App() {
  let textToHash = "foobar";
  let salt = atob("b9Txti27LxJWX9BejPSaAQ==");
  let result = pbkdf2Sync(textToHash, salt, 27500, 64, "sha256").toString(
    "base64"
  );

  return <div className="App">Hash: {result}</div>;
}

November 5, 2021

Azure Artifacts and NuGet

Recently, I had to design a solution where a common module needed to be shared between multiple projects. One way to do this in .NET is NuGet. Since our packages are commercial and proprietary, I can't publish them to nuget.org, so here are some notes on using Azure Artifacts with NuGet.

Building and Publishing NuGet Packages to Azure Artifacts

The first step is getting the feed information from Azure Artifacts for NuGet, then creating a nuget.config file in the solution and adding the feed information:

<?xml version="1.0" encoding="utf-8"?>
<configuration>
	<packageSources>
		<clear />
		<add key="[Custom Name]" value="https://pkgs.dev.azure.com/[Organization Name]/_packaging/[Feed Name]/nuget/v3/index.json" />
		<add key="nuget.org" value="https://api.nuget.org/v3/index.json" />
	</packageSources>
</configuration>

Note that I also had to add the main nuget.org feed.

For building and publishing, here's a sample azure-pipelines.yml:

trigger:
- master

pr:
- master

pool:
  vmImage: ubuntu-latest

steps:

- task: NuGetAuthenticate@0

- script: |
    SHORT_COMMIT_HASH=${BUILD_SOURCEVERSION:0:7}

    dotnet pack [Path to .csproj] -p:PackageVersion=$(PACKAGE_MAJOR_VERSION).$(PACKAGE_MINOR_VERSION).$(Build.BuildId)+$SHORT_COMMIT_HASH -p:Version=$(PACKAGE_MAJOR_VERSION).$(PACKAGE_MINOR_VERSION).$(Build.BuildId).0
  displayName: 'Dotnet Pack'

- script: |
    dotnet nuget push --source "[Custom Name]" --api-key notused [Path to .nupkg from above, e.g., ./src/ProjectName/bin/Debug/ProjectName.$(PACKAGE_MAJOR_VERSION).$(PACKAGE_MINOR_VERSION).$(Build.BuildId).nupkg]
  displayName: 'Dotnet Nuget Push'
  condition: and(succeeded(), ne(variables['Build.Reason'], 'PullRequest'))

For credentials, all you need is the NuGetAuthenticate task for Azure Pipelines. If your Azure Artifacts are in the same organization as the pipeline, then no parameters are needed. Note that using a PAT (Personal Access Token) doesn't seem to work on Azure Pipelines for Azure Artifacts.

I'm using the dotnet CLI to both pack and publish the project as a NuGet package, and using some custom pipeline variables to set the version number.

It's good to know that NuGet supports SemVer 2.0. One feature from SemVer 2.0 that I'm using is the metadata - stamping the git hash on it. Note that you need to be on NuGet 4.3.0+ to use SemVer 2.0. With .NET 6 coming out soon, NuGet version will be 6.0 as well. Traditionally Microsoft's versioning has 4 parts, so for now I'm keeping the regular version's last part as 0.

Consuming NuGet Packages from Azure Artifacts

To use the NuGet package that we've published, add the feed to the client project's nuget.config, creating the file if necessary. Then in Visual Studio you should be able to browse the feed and install the package. You might be prompted to sign-in to Azure DevOps.

For pipelines, if it's an Azure DevOps pipeline, then just add the NuGetAuthenticate task before your build step and you should be good to go. In my case I also had to consume it from other build environments such as Bitbucket pipelines and Jenkins.

Here's a snippet of bitbucket-pipelines.yml for consuming the package and building a client project:

image: mcr.microsoft.com/dotnet/core/sdk:3.1
...
...
  - dotnet nuget update source [Custom Name] --source https://pkgs.dev.azure.com/[Organization Name]/_packaging/[Feed Name]/nuget/v3/index.json -u notused -p $AZURE_ARTIFACTS_PAT --store-password-in-clear-text
  - dotnet restore
  - dotnet build [Project Name] --no-restore

The $AZURE_ARTIFACTS_PAT is a custom pipeline variable that I've created to store the PAT from Azure DevOps, which in my case only has a read-only permission to the Packaging scope.

You might've noticed --store-password-in-clear-text. I couldn't figure out where NuGet stores the password. It looks like it should update the nuget.config with the specified password, but it is not there after the update or even the add command. On Windows, it's not in the Credential Manager either.

If you don't specify it, you get the following error, running on mcr.microsoft.com/dotnet/core/sdk:3.1:

error: Password encryption is not supported on .NET Core for this platform. The following feed try to use an encrypted password: '[Feed Name]'. You can use a clear text password as a workaround.
error:   Encryption is not supported on non-Windows platforms.

Debug and Release Versions

Since this package will be used by just our teams, it would be nice if both the Debug version and the Release version were included in the NuGet package, so that the team members can debug through the code, if needed, while using the package. It seems such a feature is not supported and there's an open issue for it.

Looks like you can include symbols.

Multiple DLLs

Related to above, as I was developing the library, I wanted to organize it using multiple projects – e.g., one main project that exposes the library's public APIs and other supporting projects that are referenced from the main project (via project-references), but it seems NuGet is designed to contain only a single DLL. There are work-arounds.

Note that any other NuGet packages that you're referencing from your project, need to come from a NuGet source that will be accessible by the client.

March 1, 2021

Keycloak with Microsoft SQL Server Database (MSSQL)

Keycloak uses the H2 database out-of-the-box, which is not recommended for production use. The Keycloak documentation uses PostgreSQL as an example. Since my team would need to use it with SQL Server, I did some preliminary research on configuring Keycloak with MSSQL.

Create an Empty Database

The first thing to do is to create an empty database in the SQL Server for Keycloak to use. The example below assumes a database named KeycloakDB has been created.

If you need to use an existing database, then you can set up a new default schema for the database user to separate Keycloak data from the existing data. You can also specify the schema in the configuration.

JDBC Driver

The next thing to do is getting the Microsoft SQL Server JDBC driver. If you're using Maven and have used SQL Server in the past, you might have it already, such as in this folder: %USERPROFILE%\.m2\repository\com\microsoft\sqlserver\mssql-jdbc\9.2.0.jre15\. If not, download it from Microsoft, unzip it and locate the jar. Then copy the jar file, e.g., mssql-jdbc-9.2.0.jre15.jar over to the following location, creating subfolders as needed: [Keycloak Root]\modules\system\layers\keycloak\com\microsoft\sqlserver\main. (Note that I'm using JDK 15, which is the latest at the time of this post, but it is not an LTS release.)

Then create the module.xml file in the same folder:

<?xml version="1.0" ?>
<module xmlns="urn:jboss:module:1.3" name="com.microsoft.sqlserver">

  <resources>
    <resource-root path="mssql-jdbc-9.2.0.jre15.jar"/>
  </resources>

  <dependencies>
    <module name="javax.api"/>
    <module name="javax.transaction.api"/>
  </dependencies>
</module>

There's an alternate JDBC driver for MSSQL, the jTDS driver, which is open source. I wouldn't recommend using it since it hasn't been updated for some time now, and may not support newer versions of MSSQL. The official Microsoft driver has been open source for some time.

Update Configuration

Next, we need to update the Keycloak XML configuration file. Add the <driver> element to [Keycloak Root]\standalone\configuration\standalone.xml (I'm using standalone mode, for domain mode, refer to documentation):

<driver name="sqlserver" module="com.microsoft.sqlserver">
  <xa-datasource-class>com.microsoft.sqlserver.jdbc.SQLServerXADataSource</xa-datasource-class>
</driver>

Note that the module matches the driver module name and the path from what we've set up earlier, and the name will be used below. (The xa-datasource-class name was found from JBoss documentation)

Then search for KeycloakDS in the file and update it to:

<datasource jndi-name="java:jboss/datasources/KeycloakDS" pool-name="KeycloakDS" enabled="true" use-java-context="true" statistics-enabled="${wildfly.datasources.statistics-enabled:${wildfly.statistics-enabled:false}}">
  <connection-url>jdbc:sqlserver://localhost;instanceName=[INSTANCE NAME];databaseName=KeycloakDB;integratedSecurity=true</connection-url>
  <driver>sqlserver</driver>
</datasource>

Note that I'm using an instance name. I'm also using integrated security, which means the SQL Server's authentication DLL, e.g., mssql-jdbc_auth-9.2.0.x64.dll should be placed in the bin folder of the Java runtime. This DLL won't be in the .m2 folder mentioned earlier, so you'll need to extract it from the driver zip file.

If you need to use username and password, you can specify the following elements in the <datasource>:

<user-name>[Username]</user-name>
<password>[Password]</password>

If you do end up specifying username and password, refer to JBoss/Wildfly documentation on securely storing the password.

Now start Keycloak (restart if it was running already). You should see the new tables show up in the Keycloak database. (Keycloak uses JPA Hibernate).

After you create the initial admin user in Keycloak, do a select on the USER_ENTITY table, and you should see a new row for the user:

ExampleDS

If you explore the standalone.xml configuration file further, you may have noticed another database named ExampleDS. As per Wildfly documentation, looks like it can be removed. After removing the <datasource> element for ExampleDS, be sure to remove the datasource attribute from the <default-bindings> element as well. Note that when it's set to another SQL Server database, it didn't create any new objects or data. I suppose you can also point it to the Keycloak database, and as long as no other apps running on the same Wildfly instance are relying on <default-bindings>, it should be okay. There seems to be more information on Redhat Knowledgebase thread, but you need a paid subscription to access it... Another option is just leaving it as H2, but might not be desirable if you want to optimize memory in case of containerization.

February 7, 2021

Microsoft Teams Notification from GitHub Actions

I was surprised to find out that there is no official GitHub Actions for integrating with Microsoft Teams, because well, Microsoft owns GitHub now. There are third-party actions in the marketplace, but because some of our jobs run on self-hosted runners, I didn't want to take any chances, so decided to write a quick script that notifies Microsoft Teams on build status, and having used Jenkins Office 365 Connector already to integrate with Teams in the past, I had some basic idea of what I wanted to do.

Started out by adding an incoming webhook to a Teams channel where we can send messages to. This URL will be stored as an encrypted secret in GitHub, since anyone who knows this URL will be able to send messages to the channel.

The next step was to define how the message would look like in Teams, which is done through cards. Microsoft even has a nifty designer. At first I created an adaptive card that's more elaborate than the Jenkins plugin's card, but found out the hard way that Teams connectors don't support it. It supports the Office 365 connector card, which has less features.

The last step was just a matter of getting the build status and calling the webhook with the appropriate content.

A working demo can be found at my github-actions-microsoft-teams repository.

Here are some examples of how the notification looks in Teams:

I didn't have too much time for writing the script, so it isn't as robust or pretty, but for now, it's meeting our needs. It can probably be converted into a composite steps action for easier reuse. It could use some refactoring, and more features can be added, such as identifying which job failed, and parsing through the commit log to figure out who made the commits & merges and report on those as well, etc..

Also, I've been writing more PowerShell lately, and found PoshCode documentation that explains coding styles, such as putting the brace on the same line. As far as I can tell, Microsoft doesn't have an official coding style guide for PowerShell. The PoshCode doesn't seem to have a style for the switch statement though...

January 30, 2021

GitHub Actions Sparse Checkout

Sparse Checkout Not Supported in actions/checkout@v2

At the time of writing this post, GitHub's built-in actions/checkout@v2 does not support sparse (partial) checkout, so I decided to just manually perform the checkout with sparse enabled. As a reference, there is an open issue about this on GitHub, with some comments offering some suggestions.

Note that the script I'm using is PowerShell, since the project I'm working on needs Windows to build.

A working demo can be found at my GitHub repo. The rest of the post goes through some of my findings.

Authentication

One tricky part was authentication. A simple way would be just adding the token to the repo URL:

git remote add origin https://${Env:GITHUB_ACTOR}:${{secrets.GITHUB_TOKEN}}@github.com/$Env:GITHUB_REPOSITORY

But that's not what actions/checkout does. Also, it's not a good idea to add authentication into the URL since it maybe logged by the server (though in this case it might not be that critical since it's the GitHub server itself and the auth token expires after each run). So to follow what actions/checkout does, I tried to use the header. According the log of when I used actions/checkout, it looked like it's just the token itself, since it's masked out:

"C:\Program Files\Git\cmd\git.exe" config --local http.https://github.com/.extraheader "AUTHORIZATION: basic ***"

But when I tried it, it didn't work. After looking at the actions/checkout code, found out it actually wraps the token with additional data. Here's the snippet of the job for handling this:

- name: Git - Setup auth extraheaders config
  run: |
	$authToken="x-access-token:${{ secrets.GITHUB_TOKEN }}"
	$bytes=[System.Text.Encoding]::UTF8.GetBytes($authToken)
	$encodedAuthToken=[Convert]::ToBase64String($bytes)

	git config --local http.https://github.com/.extraheader "AUTHORIZATION: basic ${encodedAuthToken}"
Fake Log Output..?

Well, I suppose technically it's not fake, but one very interesting thing that I noticed in the actions/checkout code is that the log masking is explicitly set, and not delegated to the general token masking feature of the log output. It executes git config command with the mask as the actual parameter. Afterwards, it changes the config file with the correct value, to avoid the OS from capturing the command line with the base64 token on it. So to people just looking at the log output, it looks as if it executed the git config command with the token value, but in reality, it didn't.

In addition to the regular token value, GitHub actions will also automatically mask the encodedAuthToken above.

LFS

To handle sparse checkout for LFS, I looked at how Jenkins' git plug-in does it, by looking at the log file first from the old Jenkins job I've had setup prior to moving to GitHub, and skimmed through the code to confirm, and which led me to using lfs.fetchinclude:

git config lfs.fetchinclude folder/subfolder
LFS Pull?

Since git lfs is included in the git installation of the host runner, the checkout will actually go through the filters and download the LFS files. But I've seen some cases where it missed a few, so I decided to add git lfs pull origin. I can probably just enable skip-smudge on the checkout and keep lfs pull for possibly better performance.

Further Improvements

As mentioned above, just like the actions/checkout, the job script can be modified to write the authentication in the config file instead of executing the git config command so that the OS will not capture it.

The job only handles main/master branch builds. Probably should parse the ref to find out the branch or use explicit sha.

If you're running this on a self-hosted runner, you should also do some clean up before checkout. For GitHub runners, it's probably not necessary since every new run starts with a clean slate.

Self-Hosted Runner

One thing I want to mention about GitHub actions – compared to Azure DevOps, I like that GitHub actions' self-hosted runner is free. So I can add multiple self-hosted runners for a repo without worrying about cost. Azure DevOps charges $15 per month for each runner if you want more than one for your organization.

January 6, 2021

Updating Windows File Permission from Command Line

Here's how to update Windows file system permission from the command line, using the icacls tool that comes with Windows (C:\Windows\System32\icacls.exe):

icacls ".\folder\*.*" /grant BUILTIN\Users:(RX)

In the example above, it adds Read and Execute permissions to BUILTIN\Users.

January 5, 2021

OpenSSL Error While Creating PFX: Expecting: ANY PRIVATE KEY

Recently had to install a certificate on IIS and didn't have a pfx file, so used openssl to generate one from the certificate and the corresponding private key, but got the following error:

$ openssl pkcs12 -export -in domain.crt -inkey privatekey.txt -out domain.pfx
unable to load private key
...:error:0909006C:PEM routines:get_name:no start line:../crypto/pem/pem_lib.c:745:Expecting: ANY PRIVATE KEY

While investigating, noticed that the private key file they sent was in UTF-8 BOM format, and it looks like OpenSSL doesn't like that.

After converting it to plain UTF-8 (removing BOM), everything worked.

I've had a similar problem when using the authors file with Git LFS.

Note that OpenSSL is not part of Windows, so use WSL. It also works in Git Bash.

December 15, 2020

Getting Repository Size in GitHub Enterprise

For some reason, GitHub doesn't make it easy to see the repository size on its website. For personal accounts, you can go to Settings (no, not the Repository Settings, but your user settings) then click on Repositories from the left navigation menu. This will list out the repositories and their corresponding sizes.

For GitHub Enterprise, there doesn't seem to be a similar list of repositories with their sizes. One way to get the repository size is to use the GitHub Repository API. First, unless your repository is public, create a Personal Access Token (PAT) with repo permission that will be used for the API. Then, use Postman, Insomnia, curl, etc., to call the API for your repository using the following GET request format and the authorization header:

https://api.github.com/repos/[Organization Name]/[Repository Name]

authorization: token [Personal Access Token]

Here's an example from one of my repositories – note the size property:

Comparing the response and my repository list, seems like the unit of the size in KB.

If you're allowed to install Chrome Extensions, you can also try github-repo-size.

What about LFS? Well, you can look at it at the organization level as a whole in the Billing setting, but at the repository level, you're out of luck, though there's an open feature request for it.

Of course, there are other ways to get repository and LFS sizes after you clone and such, but it would've been nice if GitHub made it easier to see them in the first place. Here's Bitbucket, in the main page for the repository settings:

(Note that there are two hosting options for GitHub Enterprise, on the cloud and on-prem. This post is about the cloud-hosted plan).

December 10, 2020

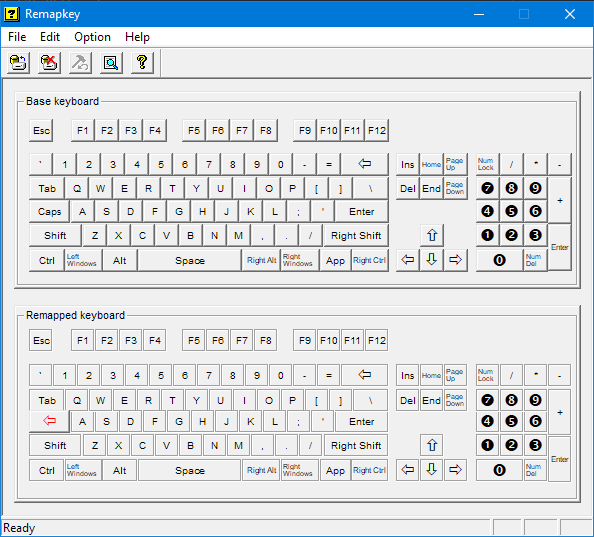
Remap Caps Lock Key as Backspace Key

Here's a quick trick that I've been using for a while now to alleviate my wrist pain (which I suppose is an occupational hazard) – remapping the Caps Lock key as the Backspace key so that I don't have to extend my pinky finger too far. It maybe also be more efficient, since it's quicker to press the Caps Lock key than the Backspace key.

I've been using remapkey.exe from Windows Resource Kit 2003 (which still works on Windows 10), but sadly it's no longer available for download from Microsoft.

There are many tools to remap keys on Windows. The recent resurrection of PowerToys now includes Keyboard Manager that allows remapping keys, so that might be a good choice to try.

September 12, 2020

Git Bash Prompt Showing Date and Time on Windows

Sometimes I have Git Bash open for several days, and knowing when I executed a particular command is helpful. Here's a quick-and-dirty way of showing the date and time in the bash prompt, which came about from looking at C:\Program Files\Git\etc\profile.d\git-prompt.sh and doing echo $PS1.

  • Copy the following content into a text editor and save it as .profile in the %USERPROFILE% folder:
PS1="\[\033]0;$TITLEPREFIX:$PWD\007\]\n\[\033[94m\]\D{%m/%d %H:%M:%S} \[\033[32m\]\u@\h \[\033[35m\]$MSYSTEM \[\033[33m\]\w\[\033[36m\]"'`__git_ps1`'"\[\033[0m\]\n$ "
MSYS2_PS1="$PS1"
  • Run source .profile to reload the prompt.

For the full list of configurable colors, refer to ANSI Color Escape Codes.

So how did I know to create the .profile file? There's a .bash_profile file in the %USERPROFILE% folder:

# generated by Git for Windows
test -f ~/.profile && . ~/.profile
test -f ~/.bashrc && . ~/.bashrc

Windows Terminal

Lately, I've been trying out Windows Terminal with oh-my-posh for PowerShell (based on the post by Scott Hanselman). You can also host cmd, bash (via wsl), etc., in Windows Terminal... I fear my days of using plain cmd and Git Bash on Windows will come to an end soon, though I'll surely miss the start up time of cmd.

August 23, 2020

SVN to Git Migration

Recently, we decided to migrate one of our "legacy" product in SVN repository to git that will be hosted on Bitbucket. It had to have the full history maintained. While researching this topic, I was surprised to find out that git has built-in support for SVN!

Steps

Note that I'm only migrating the trunk in this post, but you can also migrate the full SVN structure including branches and tags.

  1. Get the list of users that have committed to SVN (from PowerShell): PS C:\MySVNRepo> svn log --quiet | ? { $_ -notlike '-*' } | % { "{0} = {0} <{0}>" -f ($_ -split ' \| ')[1] } | Select-Object -Unique | Out-File 'authors-transform.txt' -Encoding utf8
  2. Open the authors-transform.txt generated from above and add the email address of the users. This step is actually optional, it's because git includes email addresses in commits and will help map out the users later when pushed to remote.
  3. "Clone" the SVN repo as a git repo using the git svn clone command, e.g. in bash: git svn clone http://<svn repo URL>/trunk --prefix=svn/ --no-metadata --authors-file "authors-transform.txt" /c/repos/migrated-repo --username <svn user name>. (It will prompt for the SVN password.)
  4. Create an empty repository on the git server, such as Azure Repos/Bitbucket/GitHub, and get the clone URL.
  5. Add the clone URL as origin in the git repo: git remote add origin <clone URL>
  6. Push to the git server: git push -u origin master

If you were to use LFS, you can run LFS migrate between steps 3 and 4.

Migration..?

Now, as you might know already, when you hear the word "migration", it never goes smoothly. Below are some of the issues that I had to deal with.

Git 2.27.0

So at the time, I was using git 2.27.0, and of course, git svn is broken in that release. Used 2.28 RC since it wasn't officially out yet. I suppose I could've downgraded as well.

Author Not Defined

In the middle of the process, it kicked out with a message, Author: [user] not defined in authors-transform.txt file. The [user] was the first user listed in the file. I've used the -Encoding utf8 option in the PowerShell command, and git didn't like the BOM. So opened the file in Notepad++ and converted to UTF-8 without BOM, and that did the trick.

Hanging, Timeouts and Other Errors

The SVN repo had a lot of revisions, riddled with large binaries. After getting some revisions, it hanged – no activity for a while. In the Task Manager, perl was taking up about 50% of the CPU, and the folder was not growing. So after canceling the command, cd'ed into the folder and ran git svn fetch --authors-file "../authors-transform.txt" as per this article, and that seemed to have made it continue from where it left off – it detected that the last retrieved revision was not complete, and started over again from that revision. All errors below were resolved the same way:

  • Connection timed out: Connection timed out at C:/Program Files/Git/mingw64/share/perl5/Git/SVN/Ra.pm line 312
  • 1 [main] perl 44975 cygwin_exception: Dumping stack trace to perl.exe.stackdump
  • Failed to commit, invalid old:
  • Name or service not known at C:/Program Files/Git/mingw64/share/per15/Git/SVN/Ra.pm line 312.
    (This can happen if your DNS goes down, yes, it happened.)
Checksum mismatch

This was a tricky one, and it occurred on random files. After many trials, I was able to avoid this error by running the git svn clone on the SVN server machine itself, e.g.:

git svn clone file:///c/SVNData/MyProject/trunk --prefix=svn/ --no-metadata --authors-file "authors-transform.txt" /c/gitrepo/my-project

I really don't know what the root cause is, maybe our internal network is unstable, or the SVN webserver (CollabNet) had some issues. It was a large SVN repo though, took about 24 hours to complete.

New Changes in SVN

For this migration, I didn't have to worry about two way support, since we were planning to retire the SVN after migrating to git. But I did have to get some new changes from SVN after the initial migration to git.

I used git svn fetch as above to get the latest SVN changes into git. This is not enough, though, since now I have the master branch, so I needed to bring in those changes into the master branch. This SO answer seems incorrect – running git svn rebase -l gave the following error message after running for a while:

$ git svn rebase -l
Unable to determine upstream SVN information from working tree history

Just simply doing git merge remotes/svn/git-svn worked.

LFS

If you run LFS migrate, you may no longer be able to run git svn fetch again and do a merge to master to bring it up to the latest:

$ git merge remotes/svn/git-svn
fatal: refusing to merge unrelated histories

LFS migrate rewrites commits, hence new hashes will be created for commits and git will think the master branch and the svn remote branch are completely separate since they won't share a common ancestor (remember, LFS rewrites the very first commit to add .gitattributes file). There are ways around it, such as specifying --allow-unreleated-histories option, but it may get ugly since all commits are technically different, and git will warn you about merging binaries as well:

$ git merge remotes/svn/git-svn --allow-unrelated-histories
warning: Cannot merge binary files: Libraries/MyLibrary.dll (HEAD vs. remotes/svn/git-svn)
warning: Cannot merge binary files: Libraries/MyLibrary.exe (HEAD vs. remotes/svn/git-svn)
...
...

One way to handle this would be by making backups before each step, and then you can go back to the point right before you ran LFS migrate, run git svn fetch, merge to master, then run LFS migrate again.

August 18, 2020

More on Git LFS

This is a follow up to the Git LFS Basics post – some additional notes on LFS.

Partial Clone

If the storage space is not a concern (e.g., Bitbucket's 2 GB hard limit), then partial clone and sparse checkout may replace the need for LFS. They are still in early stages, though.

Case Sensitivity

Windows file system is case insensitive, but git is case sensitive, so there may be problems when specifying the tracking pattern. According to this open issue (which was based on an older issue), you can use regex patterns, e.g., git lfs migrate import --include="*.[dD][lL][lL], *.[eE][xX][eE], [Bb]in/". Specifying it as "*.dll, *.DLL" doesn't work as expected.

LFS File Size Report

LFS has a built-in feature that will go through the history and report on the file types and sizes.

$ git lfs migrate info
migrate: Fetching remote refs: ..., done.
migrate: Sorting commits: ..., done.
migrate: Examining commits: 100% (1681/1681), done.
*.dll   5.6 GB  2013/2013 files(s)      100%
*.exe   3.6 GB    546/546 files(s)      100%
*.dat   1.9 GB        2/2 files(s)      100%
*.zip   1.7 GB      16/16 files(s)      100%
*.war   595 MB      17/17 files(s)      100%

The thing is, it defaults to showing only the top five. To show more, use the --top option, e.g., git lfs migrate info --top=100

Create .gitattributes Before or After Migrate?

Per migrate import documentation, it will create .gitattributes for you (except on certain cases based on options passed in). One thing it doesn't tell you is where it's added - it adds it to the very first commit in the history – it rewrites the very first commit (which is not surprising since rewriting history is one of the main tasks for LFS).

Find Lingering Large Files After the Migration

After migrating to LFS, if you find that the repo is still too large, you may want to run git lfs migrate info again, but it won't show any files. Instead, you can use git ls-tree to find large files in the repository. For example: git ls-tree -r -l --abbrev --full-name HEAD | sort -n -r -k 4 | head -n 10

Viewing Differences

There's no git lfs diff, and git log will show differences in "pointer" files, not the content. But in some cases, it might be useful to be able to view the differences. One way to do it is by using the external diff tool, e.g., git difftool HEAD^ HEAD Document.pdf (assuming you have difftool already configured). Note that in Bitbucket, if you browse to the source file tracked as LFS, it won't let you view the differences in the UI even if it's a "text" file, it just allows you to download the file.

July 19, 2020

Git LFS Basics

In most cases, it's not the best practice to store large files in git. It's designed to store source code, not large files. However, for some legacy projects and processes where you don't want to invest a lot time and effort, or perhaps a game project with large assets, or an ML project with a large set of training data, or you're using Bitbucket Cloud which has a hard 2 GB repo size limit, it may be necessary to do so, and Git LFS allows you to "store" large files with whatever git workflow you're using, without git's inherent "inefficiencies" with large files.

Beware that if you decide to go with LFS, you'll lose some distributed-ness of git, since the content of some files have been moved to the LFS server and not part of the repo anymore, and when you clone the repo, it will only pull down the files that's needed for checking out the master branch. Be sure to have a backup policy in place.

Here's a high level animation of how Git LFS works:

As for what LFS does, the man page explains it pretty well:

$ git lfs
Git LFS is a system for managing and versioning large files in
association with a Git repository.  Instead of storing the large files
within the Git repository as blobs, Git LFS stores special "pointer
files" in the repository, while storing the actual file contents on a
Git LFS server.  The contents of the large file are downloaded
automatically when needed, for example when a Git branch containing
the large file is checked out.
...
...

Let's go over some of the basics of Git LFS by doing the same operation with, and without, LFS.

Installation

If you have an older version of git and can't upgrade for some reason, you'll need to install Git LFS first. If you're on Windows, as of version 2.12.0, Git LFS is already bundled with Git for Windows.

Initialize and Configure Git LFS

Let's start from two brand new repos in the remote (such as Azure Repos, Bitbucket, GitHub), and clone them into local folders. In the first repo, we'll enable LFS. In the second repo, we'll leave it alone so that we can compare normal git with LFS.

In the first local repo, let's initialize and configure Git LFS:

$ git lfs install
Updated git hooks.
Git LFS initialized.

As you can see from the message, it uses git hooks to perform LFS operations. It modifies 4 hook files – post-checkout, post-commit, post-merge, and pre-push. Here's what pre-push looks like:

#!/bin/sh
command -v git-lfs >/dev/null 2>&1 || { echo >&2 "\nThis repository is configured for Git LFS but 'git-lfs' was not found on your path. If you no longer wish to use Git LFS, remove this hook by deleting .git/hooks/pre-push.\n"; exit 2; }
git lfs pre-push "$@"

Next, let's assume we have large DLL files that we need to keep in our repo, so we'll tell LFS to handle, or "track", DLL files.

$ git lfs track '*.dll'
Tracking "*.dll"

(Note that we're using quotes around *.dll to prevent the shell from expanding the actual files matching the pattern.)

Above will create .gitattributes with the following content:

$ cat .gitattributes
*.dll filter=lfs diff=lfs merge=lfs -text

According to Git LFS documentation, the pattern follows gitignore rules.

Commit and push the changes we made above.

Adding a Large File

Now, let's add a DLL to both repos, say a DLL called MyLibrary.dll which is about 1.6 MB. At this point, the two repos are about the same size, except for a few extra bytes to account for files such as .gitattributes.

  With LFS Without LFS
Folder Size: ~1.6 MB ~1.6 MB
count-objects
count: 6
size: 861 bytes
count: 3
size: 540 bytes

(The Folder Size is from Windows Explorer, and count-objects is from git count-objects -vH command.)

Stage the DLL file with git add.

  With LFS Without LFS
Folder Size: ~3.22 MB ~2.37 MB
count-objects
count: 7
size: 986 bytes
count: 4
size: 774.87 KiB

Now things are getting interesting...

  • So why is the LFS repo bigger? Git compresses objects, but LFS doesn't. An issue has been opened to address this in 2015, but still no implementation yet. It's still on their roadmap. (In a way it makes sense, since if you have large files, maybe they are compressed already, so you might not want to waste time and resources compressing it again as it may even yield a bigger file, so perhaps a more granular control is needed here.)
  • Git's count-object size is much smaller in LFS. This is the size of the push.
  • The 774 KiB for the non-LFS repo is about the size of the DLL compressed with zlib.
  • The file object is stored in .git/lfs/objects for LFS, not in .git/objects.

Let's commit and push to remote.

With LFS
$ git push
Uploading LFS objects: 100% (1/1), 1.7 MB | 89 KB/s, done.
Enumerating objects: 4, done.
Counting objects: 100% (4/4), done.
Delta compression using up to 4 threads
Compressing objects: 100% (3/3), done.
Writing objects: 100% (3/3), 437 bytes | 218.00 KiB/s, done.
Total 3 (delta 0), reused 0 (delta 0), pack-reused 0
To https://bitbucket.org/[organization]/lfs-demo.git
   09e450f..753cc3d  master -> master
Without LFS
$ git push
Enumerating objects: 4, done.
Counting objects: 100% (4/4), done.
Delta compression using up to 4 threads
Compressing objects: 100% (3/3), done.
Writing objects: 100% (3/3), 717.60 KiB | 6.71 MiB/s, done.
Total 3 (delta 0), reused 0 (delta 0), pack-reused 0
To https://bitbucket.org/[organization]/without-lfs-demo.git
   23d4243..b21091d  master -> master

Note that there's an extra step for uploading LFS objects in the LFS repo, and the push size to remote is much smaller in the LFS repo as we've seen from count-objects before.

Most git providers such as Azure Repos, Bitbucket, and GitHub have built-in support for LFS. You can also use a separate LFS server.

Cloning LFS Repo

One benefit of using LFS is that you can use git without the need to download the full git history data, as it will download LFS files as needed. In git, the LFS files it stores are actually reference, or "pointer" files to the LFS objects. Let's see a bit of how that works.

Let's overwrite the DLL with a much small one, say ~49 KB, then commit and push.

With LFS
$ git commit -m "Replaced with smaller DLL."
[master 7c9b2ab] Replaced with smaller DLL.
 1 file changed, 2 insertions(+), 2 deletions(-)
Without LFS
$ git commit -m "Replaced with smaller DLL"
[master 2286636] Replaced with smaller DLL
 1 file changed, 0 insertions(+), 0 deletions(-)
 rewrite MyLibrary.dll (99%)

Note that the messages are a bit different, and that's because as far as git is concerned for the LFS, the file that changed is the pointer file. If you run git show, you will see something like below, which shows you the content of the pointer file and how it changed. The hash is how it tracks the file between git and LFS object storage.

diff --git a/MyLibrary.dll b/MyLibrary.dll
index 91c5966..d8b338d 100644
--- a/MyLibrary.dll
+++ b/MyLibrary.dll
@@ -1,3 +1,3 @@
 version https://git-lfs.github.com/spec/v1
-oid sha256:3dce36d583ba1c741e95df1a265e47f0de581bef77ab48165dd67266be7a42ef
-size 1677824
+oid sha256:2b615798c36b1996093d44e77eb5306b4db9260546ce5aa2d3f7dde23476586b
+size 49664

Now, let's clone the repositories to new folders, and see what the sizes are.

  With LFS Without LFS
Folder Size: ~122 KB ~872 KB
count-objects
count: 12
size: 1.68 KiB
count: 9
size: 801.93 KiB

So there you have it, Git LFS is much smaller, as it only downloaded the latest commit of the DLL file.

At this point, if you look at .git/lfs/objects/, there should be one folder, in my case 2b, and inside that is 61 folder. If you open that folder, there is a file, in my case: 2b615798c36b1996093d44e77eb5306b4db9260546ce5aa2d3f7dde23476586b, sitting in at 49KB. This is the actual MyLibrary.DLL file stored by LFS with git. Note that how the folder names match the beginning of the file name, which is the hash from the pointer file.

To view which hash the file corresponds to, use git lfs ls-files:

$ git lfs ls-files
2b615798c3 * MyLibrary.dll

What would happen if we checkout the previous commit, the one that had the larger DLL?

In my case, the previous commit's hash is a4febdc, so if we checkout that commit with git checkout a4febdc, the folder size gets larger, about 3.27 MB. There's a new folder under the .git/lfs/objects folder, storing the DLL of this commit. In my case, .git/lfs/objects/3d/ce/3dce36d5...., at 1.6 MB.

If we go back to the latest commit that has the smaller DLL, will LFS delete the old one from .git/lfs/objects? No, but you can run git lfs prune, which will delete the file from .git/lfs/objects/3d/ce (though it doesn't seem to delete the folders, just the file).

$ git lfs prune
prune: 2 local object(s), 1 retained, done.
prune: Deleting objects: 100% (1/1), done.

Now you may wonder, when I cloned the repo that had LFS, do I need to run git lfs install again? The answer is no, because I'm running git version 2.27. As per this commit, LFS clone support is built into git as of git version 2.15 (released in October 2017), so it will update the hook files and such. Note that the documentation for git lfs clone has not been updated with this information.

Some Concerns

Azure Repos LFS Interface

In Azure Repos, there doesn't seem to be a UI to view and manage LFS objects as of now. There is a suggestion, but it's closed.

Bitbucket Cloud offers a dedicated UI to manage LFS objects, such as deleting them:

Maximum File Size

So LFS can support large files, but there might be a limit on the maximum size of a single file:

  • GitHub enforces 4 GiB size limit on Team plan, and 5 GiB on Enterprise.
  • Azure Repos LFS doesn't seem to have a documented limit.
  • Bitbucket doesn't have a limit, as long as you pay for storage capacity ($10 per 100 GB increments). As per their documentation: "Note that there's no limit on the LFS file size you can push to Bitbucket Cloud."
  • Note that in most cases the storage limit is across the organization/account, not per repo.
Push Size Limit
  • Some remotes may have push limit size...? If you encounter errors while pushing to remote, may need to update some configuration, such as running git config http.version HTTP/1.1.
Pipelines
  • Some remotes may require special instructions when using LFS from a Pipeline process/builds, such as in Azure Pipelines.
Deleting LFS Objects from Remote

Since LFS is built to support git's workflow where all history is stored, it probably makes sense that you need to use caution if you want to delete LFS objects. For GitHub, and also for Azure Repos and Bitbucket, to reclaim LFS storage, you'll need to delete the entire repo. In Bitbucket, as seen above, you can use the UI to delete individual objects, but this will break your git unless you also clean up the git accordingly.

Other Limitations

Additional notes can be found on the follow up post.

May 6, 2020

Enable Story Points Field in Jira

If you can't seem to enable/show the Story Points field in Jira, take a look at the Context setting.

Jira Issues Settings → Custom Fields → Story Points → click the three dots to bring up the menu → Contexts and default value.

Make sure that the project you want is selected or Global context is selected.

This is also where you can set different issue types to have Story Points field. You can also define multiple contexts.

Story Points and Kanban Board in Jira

I had to add the Story Points field to a Jira project that's been using Kanban board. Surprisingly, Jira doesn't support Story Points field for Kanban boards. One of those "the tool vendor knows better than you" situations, though they are considering it as a future feature request.

There's a value in having estimates for Kanban issues, and it's unfortunate that Jira decided not to support it. At least I can add to the issue detail view, though I wasted some time due to the custom Context setting that this particular Jira Cloud instance was using. It's very possible that it was actually me who initially set it, yes, it's been a while.

Just to make the planning easier for my team, I created a new board based on Scrum, so we can see Story Points in the backlog list view.

Epilogue

This is a bit of a rant really. Jira has a lot of customization features, with schemes and screens and such, though it's puzzling as to why they couldn't just enable Story Points in Kanban boards since they have it in Scrum boards. Like many software implementations that need to evolve, it's interesting to see how Jira is adding new features and keeping existing features on a web product that can't go down and need to service both long time existing users and attract brand new users. First was the New Issue View that you can enable from the personal settings. It lacked a lot of features when it first came out, such as copy-and-paste for images, but now it has implemented enough features that I usually leave it on. Then there's the Next-Gen projects, which currently lacks enough features that it's not usable for me, but probably geared for the new people who are not accustomed to somewhat steep learning curve of Jira configuration. It also doesn't help that built-in fields are configured through a feature named "Custom Fields".

Also, why are there two fields — Story Points and Story points estimation? Well, here's the answer — the first is used for classic projects, and the latter is used for Next-Gen projects. Now I'm beginning to wonder if Atlassian has it all together...is it time to leave Jira and look for something better?

February 18, 2020

MkDocs with Docker - Part 2: Azure Pipelines and ACR

In Part 1, we created a Docker image with MkDocs, and used the container to execute MkDocs. In this post, we will:

  • Improve the Docker image with additional MkDocs features.
  • Publish the image to Azure Container Registry.
  • Use the container in Azure Pipelines.
  • Use Azure Pipelines to publish the compiled documentation to Azure App Service.

Making Improvements

I'm not fond of MkDoc's default theme, and after trying out various themes, I've settled on Material for MkDocs. It seems to be the most feature-complete, with 3K GitHub stars and lots of extension support. (I also like Read-the-Docs theme, but it seems there are some bugs, such as code blocks rendering in a single line, and even though there's a pull-request for the fix, the developer has not merged it. That project has also been inactive for a couple of years.)

Let's change the Dockerfile to integrate the Material theme, and also to reduce some steps in preparation for Azure Pipelines. Refer to the sample GitHub repo for the project folder structure.

FROM python:3.8.1-alpine3.11

EXPOSE 8000

# Git is required for the git-revision-date plugin.
RUN apk add git

RUN pip install --no-cache-dir mkdocs && \
    pip install --no-cache-dir mkdocs-material && \
    pip install --no-cache-dir mkdocs-git-revision-date-localized-plugin && \
    pip install --no-cache-dir pymdown-extensions

# Note that /mnt/repo should be the git root folder, not the content folder,
# otherwise the git-revision plugin will complain during build.
CMD ["/bin/sh", "-c", "cd /mnt/repo/content && mkdocs build"]

I'm relatively new to Docker and python, so it's probably not the optimal Dockerfile, so will need to explore further, such as using multi-stage builds. Also should look into requirements.txt file for pip.

Note the CMD command in the Dockerfile – it assumes certain conventions for mounting the host directory path, so we'll need to follow it when we want to run the container in Azure Pipelines. If we don't want to follow the convention, it can be overwritten in docker run command.

Just out of curiosity, what shell does Docker use when it's executing the RUN command? Looks like it's /bin/sh.

Publish to Azure Container Registry

We can publish the docker image to Docker Hub, but we need to keep things private, so for this demo, let's set up an Azure Container Registry to host the docker images. Follow the quick start guide to setup an Azure Container Registry to push the image we've built above.

Enable the admin user functionality, as we'll use that later in Azure Pipelines below. Note that enabling the admin user is not recommended, but good enough for this demo. Service principals is used in production.

Azure Pipelines

To setup the pipeline, first, add a secret variable to store the Azure Container Registry's admin user password, as ACR-SECRET. Then add the following to azure-pipelines.yml:

trigger:
- master

pool:
  vmImage: 'ubuntu-latest'

steps:
- script: docker login -u <acr-name> -p $(ACR-SECRET) <acr-name>.azurecr.io
  displayName: 'Login to Azure Container Registry'

- script: docker pull <acr-name>.azurecr.io/tools/mkdocs:0.1
  displayName: 'Pull MkDocs docker image'

- script: docker run --rm --mount type=bind,source=$(pwd),target=/mnt/repo <acr-name>.azurecr.io/tools/mkdocs:0.1
  displayName: Run MkDocs build through the docker container.

The above pipeline will login to our container registry, pull down the image, and spin up a container of that image to execute MkDocs to build the documentation. One thing that may need to be investigated is if there's a way to cache the docker image so we don't have to pull it down every time. We'll need to weigh which will be more cost effective, since pulling from the ACR may incur cost. Also note that the Azure Pipelines Build Agents already have common docker images preinstalled, so we should try to use those as base when creating the Dockerfile. We'll also need to weigh the speed of the build, since loading the cache in the pipeline can also take some time.

Now, of course, you don't have to use the docker container here. You can just install MkDocs and its plugins in the pipeline... However, since all of my team members will be using the same docker container to build and test their documentation, we can be sure that it will work the same way on this build. And yes, there are other ways of enforcing those standards even if we didn't use Docker, but let's leave it at that for now.

Publish to Azure App Service

So the pipeline above does the build but doesn't actually do anything with the output of the build. Let's publish the compiled documentation site to Azure App Service. Since the site is static, I can also do Azure Storage Static Hosting, but it seems it's always public access. With the App Service, I'll put it behind our Active Directory authentication.

Follow the documentation to create the site. The documentation doesn't go into details on how to setup a static HTML site using the Portal, so I ended up just creating a Windows .Net Framework site for this demo.

Add the following to the azure-pipelines.yml from above:

- task: ArchiveFiles@2
  inputs:
    rootFolderOrFile: 'content/site'
    includeRootFolder: false
    archiveType: 'zip'
    archiveFile: '$(Build.ArtifactStagingDirectory)/$(Build.BuildId).zip'
    replaceExistingArchive: true

- task: AzureRmWebAppDeployment@4
  inputs:
    ConnectionType: 'AzureRM'
    azureSubscription: '<Your Subscription Here>'
    appType: 'webApp'
    WebAppName: '<app-site-name>'
    packageForLinux: '$(Build.ArtifactStagingDirectory)/$(Build.BuildId).zip'

There are two additional tasks added – one to zip up the content of MkDocs build output, and the other to publish that zip file to Azure App Service.

We could also use Release Pipelines, but for this demo, it's enough to just let the build pipeline handle the deployment.

Now whenever the master branch is updated, the pipeline will do the build and publish the site.

Misc. Notes

The git-revision-date-localized plugin requires git to be installed in the container, since it uses git when MkDocs builds the site. It takes the date of the commit and adds it to the compiled document, and is supported by the Material theme.

Note that there are two sections for configuring MkDocs – plugins and markdown extensions. The git-revision-date-localized is configured under the plugin section. Refer to the demo GitHub repo.

It's slightly concerning that MkDocs hasn't had a release since September 7th, 2018. There are some issues, such as favicon not working, where the fix has been merged but hasn't been released yet, though a workaround does exist — overwriting it after the site has been built, which I've implemented in the azure-pipelines.yml in the demo repo.

One of the big gripes when working with markdown is handling images — you can't simply paste in a screenshot, which we often need to do when creating technical documentation. Fortunately, Visual Studio Code has an extension, Markdown Paste, that seems to work well.